It always feels so marvelous to finish a batch of work and send it off to a magazine. But you know what that means, yes? It means I'm probably making Christmas ornaments and gifts in July. And it means that while I was making them, I was probably listening to Christmas music. Okay, more to the side of definitely.
I even received photos friends playing in the snow in Tasmania and so I was inspired to make add this wool felt Christmas Pudding sewing pattern during all the making.
The ornament is 3" wide and 3" tall exclusive of the ribbon hanger. It takes just some scraps of felt, 3 beads, and either leaves or ribbon/fabric scrap bow.
I love how the icing drips alternate in size so they look more edible and realistic.
You can get the pattern here in my Craftsy shop.
It is also available in my Etsy shop but there are no fees for sellers or shoppers on Craftsy. Feel free to shop in either store.
One of the methods I was playing with for the magazine was embroidery that looks like faux knitting. I decided on an ornament that employs rows of chain stitch and a bit of knitting or cross stitch pattern.
But I also discovered Ceylon stitch which looks remarkably like a knitted fabric. Using the same dark brown tweed I used for the pomander cloves, I realized it had an entirely figgy pudding look and am playing with a faux knitted Ceylon stitch Christmas pudding brooch. I'm in the process of laying down the "fabric" now.
I'll try to post a tutorial for Ceylon stitch soon.
Another one of the magazine projects was inspired by an antique look I had used for a Christmas Stocking pattern I used to sell. I transformed it into hoop art and love it so much, I think I'll make some more styles.
I'd like to say it's beginning to look a lot like Christmas in my sewing room, mostly it looks like Armageddon. Today is clean-up day.
And then, of course, I'll be making a merry mess all over again.
I'll leave you with this teaser of my felt pomanders "drying" on the windowsill. I am not allowed to show you the whole thing yet.
Leave a comment: What are your plans for Christmas making? Have you started buying patterns and searching tutorials online? Or do you wait for the Christmas magazine issues?
Lavender.
Do I need to say more?
Even the Arizona desert cottontails love it.
I listed this pattern awhile back but had not gotten around to stitching it. I finally finished it last night. Here is my version of this modern lavender landscape. It reminds me of July monsoon in the Sonoran desert.
And here is a customer's Instagram of the making of the lavender.
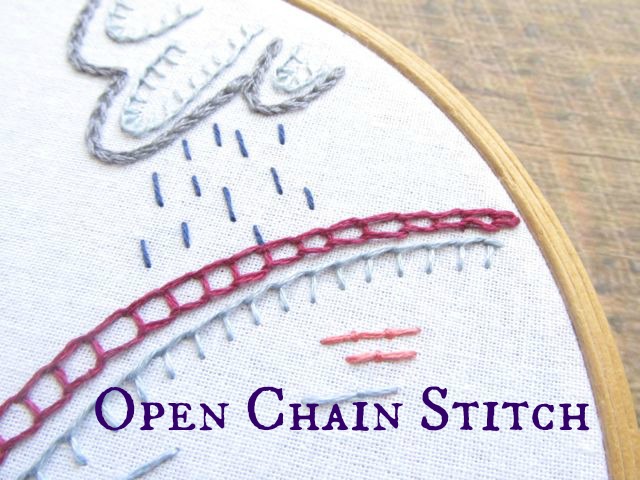
The pattern is pretty open-ended so you can use stitches of your choice. I did use an open chain stitch in that lovely magenta/red and thought I could teach that to you.
New Stitch:
Open Chain Stitch
Open chain is worked pretty much like chain stitch is, except the loops are held open and wide and boxy rather than seed-shaped.
On my lavender embroidery pattern, I have a some outlines of the tops of the hills so I decided to use a couple of the lines as guides for open chain stitch.
It isn't necessary to have two lines, but it makes it easier to make the stitch neat.
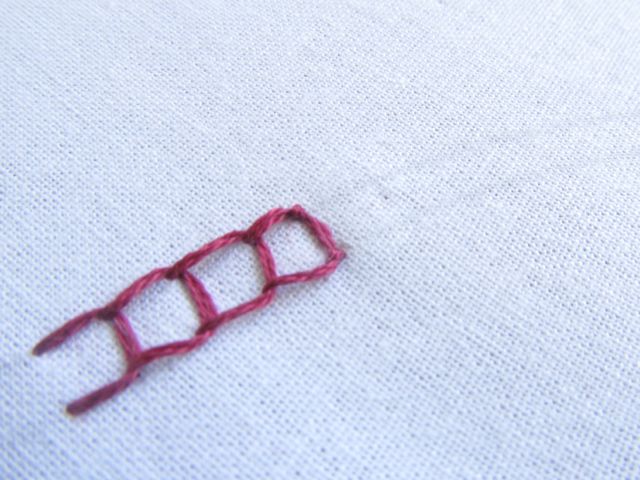
Bring the needle up at the bottom of the first chain and to one side and bring it down right across at the other side..
Bring the needle back up on the first side (in this case the left) where the next chain will begin.
Pull on the loop just a bit and place the needle in on the right side where the end of this first chain will be "caught". Don't pull too tightly yet.
Again, bring the needle up above and on the left where the third open chain will begin.
Bring the needle back down on the other side.
This is when you can gently pull the chains tighter as you go along.
When you get to the end of your row, you can use a simple normal chain to end the row. It will look a bit pointed like this:
Or you can keep the boxed look by taking a couple of tacking stitches to hold the shape of the last open chain.
Now go smell the lavender!
Remember the dining room? No, not the place where we eat all our meals now, but the separate room with the china hutch and credenza where the "good" dishes and etched crystal goblets waited for "company". Remember the drawer with the silver?
My grandmother had one such room. Not a large one. It was just big enough for that table and chairs and the hutch, but it was where we ate holiday and event dinners. The table had two leaves to extend it. And there was always an embroidered tablecloth brought out for special.
Most of these, my sister now has stored away in her home. My family has moved far too often to be able to keep many heirlooms. And these days, decorating is more modern, more abstract, more playful; decor more open and airy.
But still I wanted a tablecloth for "company". So I decided to create a sampler tablecloth using running stitch circles and a variety of simple stitches.
The tutorial is here at Sew Mama Sew.
Just grab some hoops and thread and your basic stitches here at Embroidery School and follow the steps to create your own Sampler Tablecloth.
And don't forget to send me some pics to share when you get your going!
The Readers' Digest Complete Guide to Embroidery Stitches is one of my new favorite reads right now. I got a copy from the library but might have to put this on a Christmas wish list.
One of the things I like about this book is that it's not just a guide to stitches but also types of embroidery such as pulled stitches, smocking, and embroidery on canvas often called needlepoint.
It's a cmplete instructional guide with helpful sections on needles, hoops, and fabrics, as well as stitch variations and skills building.
The how-to illustrations are very clear and there's also a color photo of each stitch. There are more than 260 stitches explained in the book.
I even found a very rarely taught stitch I'll be using in an upcoming magazine project I'm designing: the knitting stitch. It's not knitting but looks just like it!
The Reader's Digest Complete Guide to Embroidery Stitches was published in 2004 and this seems to be a printing from 2006. I'm shocked, though, that this particular book looks brand new. I'm going to have a card written up so I can put it on a Reader's Choice shelf at the local library.
This book gets a thumbs up from me!
Winter is firmly entrenched in the Glass House Mountains and brings cold fog and rain or sunny days with freezing nights. Even so, Australia is mainly populated along the coasts, and it's beach weather somewhere so summer is never far from the mind.
Today's bone-chilling pea-souper fog has led me to warm myself up by putting together a tutorial for a summery watermelon embroidery. It doesn't get much sunnier at heart than watermelon and a couple of bright and buzzing bees.
The watermelon is made using chain stitch and the seeds are lazy daisies which are really just individual links of the chain. The little bees are made using bullion knots, french knots, and lazy daisy stitch. We learned how to make chain stitch in Embroidery School's Lesson Four and lazy daisy stitches and french knots stitches in Lesson Six. For this tutorial, I've included how to make bullion knots so you have all the skills you need.
Materials needed:
5" embroidery hoop
6" or 7" embroidery hoop
white cotton embroidery fabric
pencil
colored pencils (optional)
needles
scissors
DMC stranded cotton embroidery floss:
310 black (seeds: 6 strands/ bee: 3 strands)
3058 pink (6 strands)
3831 salmon (6 strands)
732 green (6 strands)
726 yellow (3 strands)
972 gold (2 strands)
Blanc (6 strands)
NOTE: The work is done using a larger hoop and then the finished embroidery is framed in the smaller hoop.
My watermelon uses two colors for the fruit because I realized I was going to run out of the pink. You can use one or both colors or another pink of your choice. I rather like the two colors together.
WATERMELON AND BEES EMBROIDERY:
To make the watermelon:
1) Prepare the fabric by tracing the inside of the 5" hoop on the wrong side of the fabric. Using sewing thread or a single strand of any embroidery floss, baste a line of running stitches along the traced line. This is just to give you the perimeter of the circle without having to mark the right side of the fabric.
2) Using the inner ring of the 5" hoop, lightly trace the outer edge of the ring to make the area for the watermelon. Just leave enough room for the bees outside the area designated for the watermelon.
3) I used colored pencils (Staedtler children's colored pencils) to darken the rind and fruit areas of the watermelon. This is optional. At first, I made it too light and then darkened it up. I think I could have made it much darker. Experiment! Or do without.
4) Start at the top edge of the juicy pink fruit and chain around the shape of the watermelon in an arc. At the end of the first arc, finish off the stitch and then start a new row going in the opposite direction. Continue working chains until the fruit is filled.
5) Stitch 2 or 3 rows of Blanc chain arcs above the pink fruit.
6) Stitch 2 or 3 rows of green rind above the white.
7) Make a few randomly placed black lazy daisy seeds adding a single stitch in the center to loosely fill the stitch.
Before we make the bees, we have to learn to make the Bullion Knot.
New stitch:
Bullion Knot
Bring the needle to the front of the fabric at A. Insert the needle at B and bring the needle halfway out at A. The distance from A to B is the length of the stitch. Be careful not to split the thread.
Wrap the thread around the tip of the needle five or six times and pack the wraps down evenly around the needle.
Hold the wraps in place around the needle and pull the needle through the fabric and the wraps.
Pull the thread towards B and push the wraps into place. This should tighten the stitch onto the fabric.
Insert the needle at B and bring the thread to the back of the fabric.
To make the bees:
Each bee is made of 6 bullion knots (small to large), 2 french knots, and lazy daisy wings.
1) Lay down 3 black bullion knots leaving some space between. Wrap the smallest 3 times, the middle knot gets 5 wraps, and the largest gets 7 wraps.
2) Then use the yellow to make the alternating bullion knots of 4, 6, and 8 wraps.
3) Make two french knot antennae, wrapping just once to make a small knot. Add lazy daisy wings, four for each bee.
Pull the basting thread out and mount into a 5" hoop for display or giving.
Bonus lesson!
How to change thread during chain stitch
In Lesson Four of Embroidery School, I showed how to change thread while working blanket stitch. Changing threads during chain stitch is very similar. You might need to change threads to change color or because your have run out of thread.
The keep your chain stitch continuous while changing threads, bring the thread to the back of the fabric, leaving the loop extra large. Leave the tail of the thread at the back side of the fabric.
Thread the needle with the new strand and bring it out the front of the fabric where the end of this chain will be.
Continue to make the next chain stitch, tightening the large loop by pulling gently on the tail. Knot the leftover tail or weave in the tail if you are using the no-knot method.
I feel warmer already! A summer design for a wintery day down under. And if you're in the middle of your summer, enjoy this juicy treat!