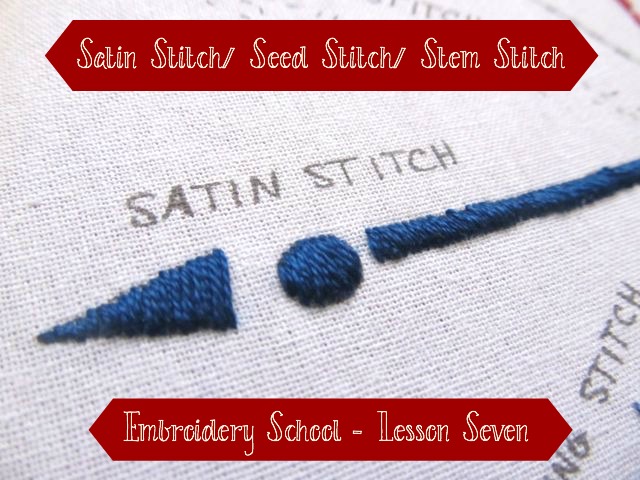
This is the last day of the sampler making. You should be proud that you made time for yourself. Time to hold something creative in your hands. Time for making.
Embroidery School has one more week. We have to learn how to prepare our work for framing or how to display in the hoop. And we have to learn things like washing stitched work. There's a bit more to learn.
But let's wait no more for the last three stitches!
Satin Stitch
Satin stitch is used mainly as a fill in stitch. It's provide a solid coverage of specified area. Sometimes satin stitch is bordered with an outline stitch, such as back stitch, but not always. Inside a large outline, the stitches are staggered but here we'll start simple.
I used 3 strands for this stitch. Basically you're working back and forth along the outline, filling it in with straight stitches.
Bring the needle to the front at one end corner of the outline. Insert the needle on the other side of the shape and lay down a stitch. Lay down another one right next to it.
Continue filling in the shape this way until you reach the end. Pull the last stitch through and knot or hide the thread.
When shapes are not squared off, the stitches that are laid down in their rows may be of differing lengths so they fill and match the shape.
The arrow is filled with stitches of decreasing size until the last stitch (the point) which I made horizontally into the last small vertical stitch.
Seed Stitch
Oh boy! Little seeds on the ground! This couldn't be any easier. This is just a whole lot of running stitches, but teeny, teeny, tiny ones!
I worked some of these with 4 strands and some with two to give it some texture.
Back of the work. You can't make it any neater.
Stem Stitch
The lines on the pattern are there to show you how the stitches are overlapping. But to stitch it, imagine and follow a straight line right through. I used 3 strands, but in hindsight, I would recommend 4 strands to completely cover the transfer image.
Bring the threaded needle up from the back at one end of the line. Insert it into the fabric at the end of the stitch and pull through to the back, leaving a loop. Bring the needle back up about halfway down the first stitch and pull through.
Insert the needle at the end of the next stitch and pull through, leaving a loop again. Bring it back up about 1/3 into the entire stitch - about halfway between the end of the last stitch and the thread on the right.
You will continue to make stitches this way. You only go halfway on the first stitch and about 1/3 the total stitch on the remaining.
This is how to do it if you don't want to use the stab method.
Work to the end of the row and bring the thread to the back and knot or hide the thread.
Back of the work:
You've done it! You've learned TWELVE embroidery stitches and you've made a sampler!
Use any stitch for the center circle that you like to fill in or outline (or both).
And the tree sampler? Here is mine all finished and how I used today's stitches below. I've added the feather stitch border as promised.
There was no real plan for the satin stitching. I just had some fun imagining shading.
Stem stitch for trunk - 3 strands. DMC 434
Seed stitch for leaves - 4 strands. DMC 3053 and 502
Satin stitch on the trunk - 3 strands. DMC 434 and 801
Feather stitch border - 3 strands. DMC 814
Don't touch that trackpad! There's more to learn! Next week is the last week of Embroidery School. Lessons will include how to display embroidery left in the hoop (hoop art) and how to prepare work for framing, washing and care of embroidered work, and how to pack up and store your tools and projects at home and on the road.
I'll also unveil some new designs that will be in the shop next week. So stay tuned, chickies! And have a great weekend!


Just came across your wonderful series with the two great samplers! I haven't read through all the lessons yet, but the tutorials look amazing, with nice, clear photos to follow. I will definitely recommend this series to any stitcher who wants to try out hand embroidery :)
ReplyDeleteThank you, Aurelia! I really wanted to make this an easy to follow, successful venture for anyone who wanted to try it out. And I wanted it to be a bit comprehensive. Twelve stitches! Gosh it sounds like a lot, but when it's a single line of each, at least that's doable. Thanks for the feedback and thanks for sharing.
DeleteThank you so much! I am really enjoying learning embroidery! I am amazed that I can already make a picture. Just the border to go!
ReplyDeleteGood for you! That's awesome! I'm so glad you came by and stuck with it!
Delete