
How are you enjoying your time without buzzers and beepers in your hands? Mighty relaxing, isn't it?
Now maybe you're remembering what it's like to have time for YOU. To refresh. To be tactile.
That's what my patterns and stitching tutorials are all about. We all need that time.
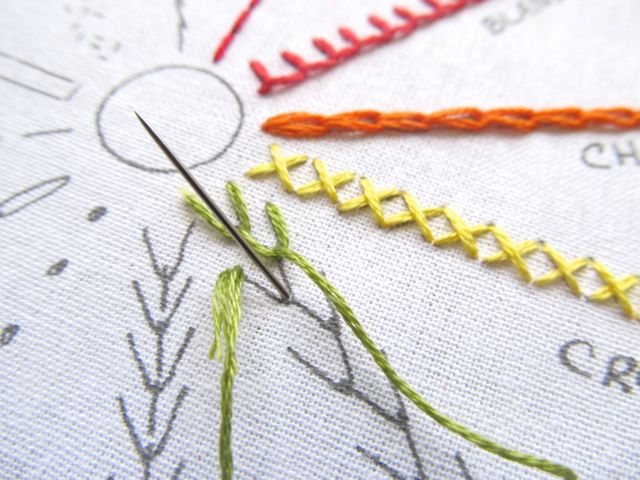
Time for the next three stitches in the sampler. Cross stitch. Feather stitch. And fly stitch.
Now, I haven't used feather stitch in the tree sampler. I was saving that to add as a decorative border at the end of the work, so if you are stitching up that sampler, you'll only have two stitches today, unless you are using a large enough hoop to make the border. If you have used a 7" or smaller hoop, you'll have to move it around a bit to make the border or use a larger hoop if you can.
Cross stitch
This is a dream of a stitch and you'll see why people make whole pictures out of cross stitch. It's easy, can outline, can fill, and has a very simple and homey look about it. It's vintage, retro, and geometric modern all at the same time.
Bring the threaded needle up from the back side of the fabric at the lower end of one diagonal. Take the needle back down at the other end of the diagonal line. I used 3 strands here.


Repeat this line of diagonals all the way across.


When you get to the end of the row, bring the needle up at the bottom point of the diagonal line leaning the other way.

And head back the way you came, covering these diagonal lines in the same way.


When you get to the last one, bring it to the back and knot or hide the thread.

Feather stitch
When you look at all the lines drawn, it looks complicated, but it's really just a bunch of Vs connected at the points.
Bring the threaded needle up at the top left of the first V and insert it back into the top right of the same V. Bring the needle back up at the point, catching the loop of thread and pull through. I used 3 strands for this stitch.


This is now the top left of the next V. And then you just make the next stitch the same way. Insert the needle in the top right point, pull through a bit, bring it up at the point, and pull through catching the loop to make the whole V.


At the very end, take a small stitch to the back to secure the point and knot or hide the thread end.


Fly stitch
Oh dear! Isn't this like the last one?
Yes, chickies! It is so much like the last stitch we learned. That's what makes embroidery so easy!
But in fly stitch, instead of joining the stitches up, they are separate.
Bring the threaded needle up at the top left and continue as if this was a feather stitch. But once you make the V, you bring the thread back down like a little tail and it becomes its own stitch.


And then you make the next one the same way.


These can be made in a row and pretty much connected, long or short tails, or further apart, so they show up like little seed pods, bird tracks, or flying geese.

Back of the work:

NOTE: It doesn't matter if you start feather and fly stitches from the left or right tips. I tend to start from the outer tip in a row of feather stitch. It's really up to you. Same goes for cross stitch. You can work the diagonals from left to right and then come back right to left, or vice versa.

Here's the Alice Brooks-style tree sampler using cross stitch and fly stitch. As I said, I'll be adding the feather stitch border at the end, so you'll have to wait for the big reveal on that.
Cross stitch on the fence - 4 strands. DMC 783
Fly stitch as birds - 3 strands. DMC 310
Well, aren't you clever! You've stitched half a sampler already!
That's it for today! See you tomorrow. Remember to share Embroidery School with your friends.
Wonderful tutorial. I really loved it. God bless you. Thanks for sharing.
ReplyDeleteYou're very welcome! I'm so glad you liked it. My goal is to make it as easy and understandable as possible.
Delete