Thursday, May 26, 2016

SweaterDoll Gets a Makeover


Over the next week or so, I'll be working with XXXXXXXX to move the blog to a real website. 

UPDATE: No new website due to problems with the designer.

Let's continue our foray into the land of "put-that-nonsense-down-and-do-some-stitchery" which is a happy place I love to share.

The blog has been cleaned up and many old posts with invalid links removed, but the best is still here: quaint textile history, the origins of SweaterDoll, mending how-to, natural craft and toy stuffing reviews, and the shiny new Embroidery School.

You know, it all started when I was given a stamped cross stitch potholder by my grandmother when I was seven, and from then on I was never far from needle and thread. Recently, this memory inspired the Embroidery School series so I could gift this quiet joy of stitching to other busy folks. Its sudden popularity inspired a growing range of simple, artful embroidery patterns, many of which can be worked up in an evening or two. 

The SweaterDoll message is this: It may look like embroidery, but it's really time for YOU. 


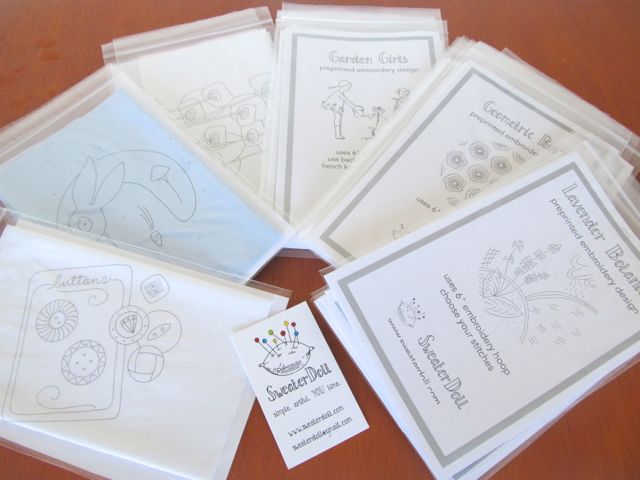
Want something more? I have lots of patterns and pre-printed embroidery designs in my shop.

In the meantime, click on everything! Check out Embroidery School. And my tutorials. Or you can mess around over to the right in the blog archives. 

I'm so glad you've arrived. Put your feet up. I'll make the tea.


Monday, May 23, 2016

Doing Less and Doing It Well

 (https://mattyginc.com/)

Sometimes you just need to listen to the voices in your head that are calling to you: let's go a'wandering.

Most times, I just go take a shower, a long-water-wasting-playing-with-lather-blowing-bubbles-making-beards shower. That is my default disconnect from my brain.

But then there are the times I've been sitting too long and need to walk or dance or both and sometimes both in a thrift store because it is frowned upon in the library.

Last week, I made myself take a day off and go a'wandering. I walked through my little town of 2 blocks of art studios, book shops, and cafes and went into stores I don't normally visit.

And then there is the Maleny animal trail. Every other shop or house on or near the main drag has a wooden sculpted animal, made by a local artist. (See platypus above.)

But this adventure was a struggle. I would sit too long, think too much, and stitch too fervently if I never took some time off. To disconnect. Or reconnect. Doesn't matter.

By the end of the week, I had actually accomplished more. Not that being more busy was my goal, but I did have things that needed ticking off the list and they were starting to bog me down. 


I sent off my my first Caloundra Sewing wholesale order for stamped pre-printed embroidery patterns. I designed several new patterns and stitched and listed a few already. I finished the My Stitch Book ebook. And I found the perfect fabric for a magazine project I have to ship off in the next couple of days. And it happened painlessly. 

Right after I took time off.


When I did, I completely let go of all the things in my head, all the lists and to-dos. I recommend taking a walk, being present, talking to new people, not talking about your list. Do less and do it well. It's like a good hot relaxing shower. Without the soap beard. 

Plans on the worktable?

A series of posts about storing your embroidery projects. New listings in the shop all week. New ideas like embroidered bookmarks. I'm working on embroidering a cushion cover with "fabric" thread. 

Feel free to visit the shop in the meantime. The embroidery patterns are meant to give you good follow-up to Embroidery School. You did great, by the way! More and more of you are sharing your success stories. I'm so glad you enjoyed it. 

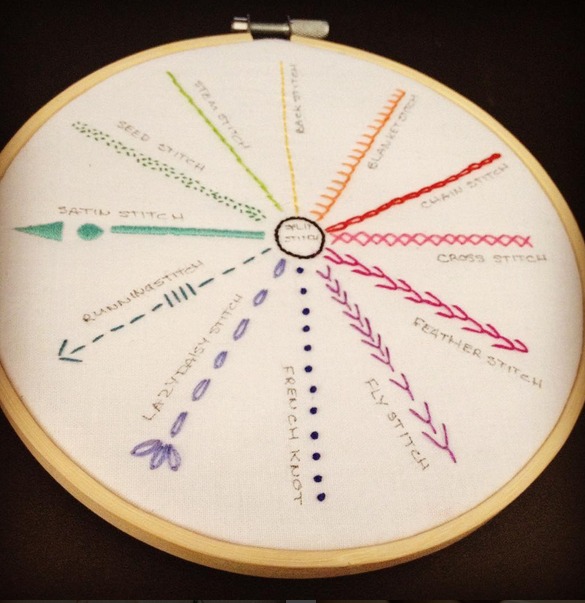
In fact, I leave you with some Instagram inspiration. These were made by Dawn. Dawn worked up the Embroidery School sampler and the Lavender Botanical embroidery pattern. Thanks for sending pics, Dawn! (hint hint - share yours, too, dear reader)


Thursday, May 19, 2016

Low-Tech and By-Hand - behind the scenes


These are my most basic tools.
Hmmm...perhaps I should explain. Think Tasha Tudor.

Tasha Tudor (1915-2008) was a remarkable illustrator and writer of children's books. And she lived a simple life, raising children, gardening, drawing and painting, milking her goats, and living what we would now call an off-grid lifestyle. I think she simply might never have gone "on-grid". And yet she was published for 70 years of her life, sending hand drawn and painted images to the publisher. No digital files. No emails.

If you know anything of her talent, I won't insult you by claiming any such brilliance. But I do share her love of things that can be made by hands. Not thumbs. Not fingertips. The whole hand. Both hands. 


At some point, it was confirmed that I have something called dyscalculia, which explains why I can't add in my head, can do geometry but not algebra, decimals but not fractions. It has everything to do with why I don't try to learn software and website development. I have had hashtags explained to me ten times and I still don't get it.

So I hand draw my patterns and illustrated instructions. Sometimes my drawings are quite lovely and sometimes a bit on the funky side. My handwriting is absolutely atrocious. I try to go slow to make up for that. There are always little glitches in the work but they don't affect the patterns.


There is a unique odor to pencil lead. And you wouldn't believe how well a pumice soap removes ink from skin. Is hands-on also head-free? Is my mind freed to dream if it is not being fed images from a screen? 

Do forgive me for remaining low-tech and by-hand in a world of click-this and #selfie. But I suspect you rather enjoy a little Victorian dressing-up and dancing to the Ramones. Probably at the same time. 

The party is at my house. I've got the tea, the fabrics, and lots of pencils. Come on over!

Tuesday, May 17, 2016

Button Samplers and Two New Stitches


You have spoken. I have listened.

There are a number of patterns that have come out of the feedback you've given me during Embroidery School, and the very first is ready for you! It's a set of three Button Samplers!

These samplers use stitches you have learned, plus a couple of adaptation stitches described below. 

Start with the sampler that uses back stitch. It's the easiest. Then move on the the blanket stitch buttons. Last, move on to the lazy daisy buttons.

The pattern is available as a PDF document and includes the images in forward and reverse for whatever transfer method you choose.

You can use the patterns to make hoop art samplers or you can use the designs to embellish clothing, tote bags, or quilt blocks.


In these samplers, you get to practice the back stitch, french knots, lazy daisy stitch, satin stitch, blanket stitch, and learn two new stitches: crossed buttonhole stitch and up and down buttonhole stitch.


Hold it right there, Allison! We didn't learn buttonhole stitch. 

Actually we did. Blanket stitch is also called buttonhole stitch though these two variations are known as buttonhole stitches. Don't know why and it doesn't matter. What matters is that they are so easy to learn and so lovely, I wanted to add them to the samplers and also teach you two new stitches. 

Head over to the shop and get your patterns so get started on your next embroidery adventure!

New stitches:

Crossed Buttonhole (Blanket) Stitch

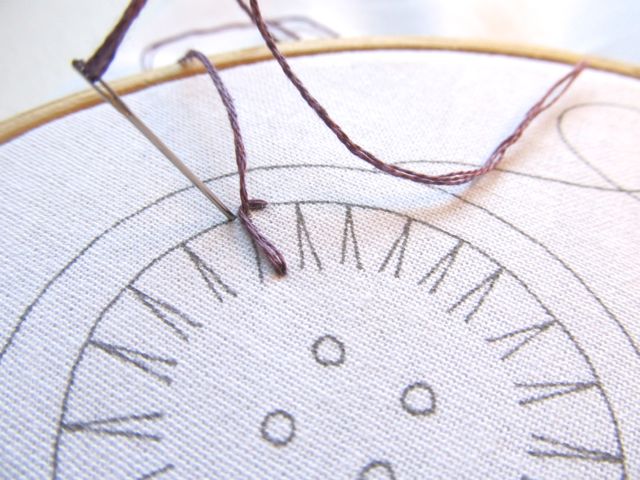
Bring the threaded needle from the back of the fabric just to the left of the bottom of a cross.

As shown in the photo, take a stitch under the cross and catch the thread as is normally done in blanket stitch.


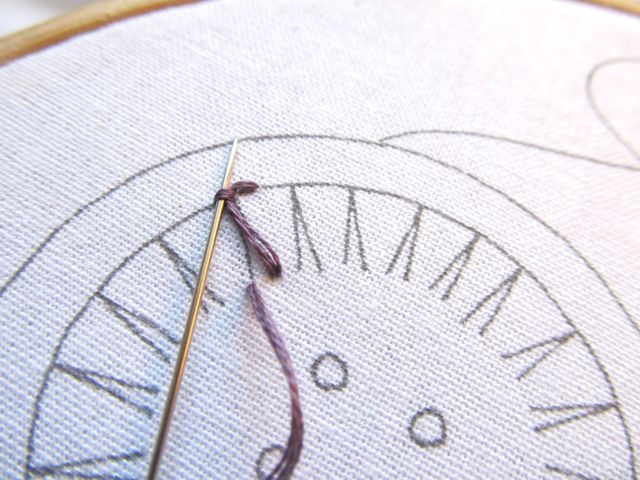
Stitch the other side of the cross as shown below. basically, it's just two blanket stitches right next to each other but the inner spokes are crossed.


 Up and Down Buttonhole (Blanket) Stitch

Start the same way you did above or with any blanket stitch. In this case the stitch made is furthest left of the pair of "up and down" spokes.


 Once the actual blanket stitch has been made as shown below, take a small stitch at the corner.


 Bring the needle up at the end of the the other up and down spoke and pull the thread through the small stitch. Then proceed to make the next blanket stitch.


 Make another small stitch and repeat.


Yay! You've learned two new stitch variations to use in the Button Samplers.  

I hope you enjoy them as much as I did. Play with colors. Add other stitches if you like. Samplers are good for experimenting.

Wednesday, May 11, 2016

Taking Stitchery On the Road or Just Around Town - Lesson Eleven Embroidery School


With a little forethought, you can take your embroidery anywhere you want to go.

Embroidery work itself only uses a few tools and these are generally rather small which can be both a plus and a minus. A few thread bobbins, a pair of embroidery scissors, and the hooped work takes very little room in a medium sized zip bag or canvas tote bag for larger hoops. But it is the needles where stitchers start to get nervous. 


These are some main points to follow while traveling with embroidery, whether just around town or while traveling greater distances.

Hoop it up. 
In the hoop, the project is ready to be worked on whenever you want.

Choose supplies carefully.
You won't need all of your threads so decide which ones you want before leaving and bring a minimum of supplies: scissors, needles, threads, and a stitch guide if necessary.

Pack and store the project with both ease and disaster in mind.
Pack in sectioned storage (such as a tote with pockets for each item or in the outer pocket of carry-on luggage, backpack, or handbag) so the project and supplies can all be accessed easily. Keep the whole thing well-protected in a plastic bag (or several) in case of spills within your luggage or rain while you are out and about.

Don't be too product oriented.
You might get quite a bit of work done. You might encounter too much turbulence to work. The person next to you might strike up a conversation that takes you away from the work. That's just fine. You're away from home - it's about the journey, isn't it?

Here are some additional travel tips from crafty ladies I talked to:

  • Thread some needles, stick them in a scrap of fabric, wrap the whole thing in your embroidery project. This way you avoid having to thread needles in a moving vehicle or busy cafe and you won't have to search for your needles.
  • Projects can be carried in a zipper cosmetic bag or make-up case, a pocket of a backpack or section of a handbag, dedicated tote bag, or a small plastic tub with lid.
  • Switch to a chenille needle to make threading easier on the road.
  • Bring a good portable light if you camp or stay in accommodations that don't provide a good reading light.
  • If you take a project that's rather large, pack the project in luggage but bring a smaller part of the work, such as making yo-yos or a hooped section of redwork, onto the plane or in the car.
  • Keep projects clean and neat by keeping tools in a zip pencil case and embroidery work in a plastic sleeve page protector. Or keep everything organized in ziplock bags in case something spills in your travel case.
  • If you are concerned about losing sharp needles, take a cross-stitch project and use blunt tapestry needles.
  • Keep everything organized and take projects that don't require you to scrutinize detailed instructions.


I blogged a bit about traveling with embroidery. For the series, I created my Embroidery YOU Time Tote designed specifically to hold hoops, scissors, threads, and needles. You can download the free sewing pattern for free. It's not large so you can take it anywhere you'd take a small handbag. 


If you are looking to upcycle something in your home, you can see how I reused a ladies' wallet to carry all the essential supplies sans the hoop. Or maybe a hanging travel toiletry bag would suit you. A soft cloth zip lunch bag works perfectly as an embroidery tote. 


NOTE: Avoid vinyl lunchboxes as they leech lead into your skin. And remember, modern-day oilcloth is just vinyl laminate, not actual oilcloth.


My grandmother had an an old-fashioned travel make-up case that carried her needlework. If you have a portable sewing case you love, but still have a fear of losing needles, sew up one of these Travel Pincushions. It closes with a 4" purse clasp so needles stay put inside and won't get loose.


At the very least, you can use a ziplock bag to gather those few items you need and throw them in the glovebox of the car or the outer pocket of a backpack or small suitcase. 


Flying with scissors

If you are traveling with scissors restrictions, then cut some strands of embroidery thread before you go and pack the scissors in the checked-in luggage. 

Traveling gracefully with needles

Air travel with sewing needles is not restricted but is allowed at the discretion of airport security agents. I generally keep a threaded needle in my work so they can see its intended purpose easily and quickly. Avoid the stress of having all your embroidery needles randomly taken away: pack the majority in checked bags.

Use a needle case for needles so they don't get lost, or glue a strip of magnet (or one of those local business-card sized magnets from your plumber or vet) to the inside of a small Altoid's tin and keep your needles there. You can also buy magnetic needle cases at fabric stores.

Where can you take your stitchery?

    •    to the local cafe
    •    doctor appointments
    •    family get-togethers and visits
    •    vacation by the beach or on the ski slopes
    •    to a crafternoon
    •    on long drives (please be the passenger)
    •    hospital stays or visiting a sick friend
    •    camping
    •    concerts in the park

My stitchery goes where I go. Arm yourself with needle and thread and get out there and make something!

Woo-hoo! It's graduation day and you've completed Embroidery School. 

You can be very proud of yourself for taking some YOU time all for yourself, unplugging, engaging your hands and skills. Or perhaps you used the series to teach someone else. Fabulous! 

What's next? Several "students" contacted me, separately as they are from all over the world, and with their feedback, I have designed a series of embroidery patterns and samplers I think you'll enjoy. 

Don't forget to subscribe to the newsletter to keep in touch as I will be continuing to offer instruction and patterns to keep you rolling in YOU time, whether alone in your cozy armchair or with best friends at a cafe.

 Happy Stitching!

Tuesday, May 10, 2016

Organizing and Storage - Lesson Ten Embroidery School


Congratulations! You have done a great job here in Embroidery School. You've transferred a design, chosen thread colors, learned twelve stitches, and framed or mounted your work. "Time to clean up!"

Uh, oh. How on earth to store supplies accessibly and neatly, and maybe even portably so you can take your work wherever you have to go and still have YOU time.

You know, that completely enjoyable unplugged time at the cafe, or during that hour in the dentist's waiting room, or the not-in-the-mood-for-TV-or-a-book personal time, or the please-take-this-phone-out-of-my-hands time. 

Embroidery is a great method of retrieving YOU time from the over-busy, over-buzzing, over-beeping, over-spending mode of being we sometimes fall into.

In order to enjoy it again and again, there has to be a way to design a storage system that doesn't take up half the dining table or get lost in a box somewhere in the back of the hall closet.


First, here's a little look-see of my set-up and below is a link to a collection of ideas for truly awesome storage and organization systems. 

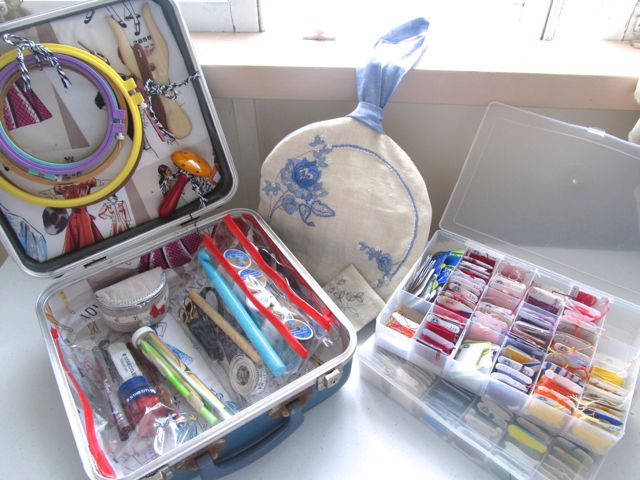
Except for fabric, drawing and tracing paper, and my iron, this is actually all I use for embroidery. And this includes my YOU Time Embroidery Tote for taking my work anywhere and storing it between stitching sessions. The sewing pattern for it is free and downloadable.

The larger version of what I need to store includes a place to do the ironing and shows fabric on a roll and freezer paper for printing my patterns. 


My studio is not the height of coolness. But it magnificently serves my love of low-tech simplicity and my need for portability as I am, what I call, fatally nomadic. I move a lot, and I don't often have a separate room for sewing and stitchery.

Generally, these are the things that need storage solutions:

Basic sewing supplies - needles, sewing thread, pins, scissors, measuring tapes, iron and ironing board or pad
Basic drawing supplies - paper, tracing paper, pens, pencils, sharpener, eraser
Embroidery supplies - embroidery threads/floss, hoops, fabric
Basic work space needs - table and chair, lamp and/or good natural light
Other items that help if you share or blog about it - printer, freezer paper, computer, back-up drive, camera and battery charger 

Craving simplicity

It used to be that a couple of tins of threads and sewing supplies was enough for a stitcher. Now we've made it so complicated with dissolving fabric, special pens, and "the stash" which can be a monster in and of itself. 

I have learned over my 50 years of stitching and needlework, that if you are having trouble organizing your supplies, you probably have too many supplies. And that really takes the fun out of being able to enjoy some quiet, or even shared, time embroidering.

The very bottom line of embroidery storage is going to be needles, scissors, fabric, and threads/floss. Embroidery threads or floss is the main one.

Threads and floss

You know those absolutely gorgeous photos of embroidery floss in perfect rows in storage boxes? This isn't one of those. This is reality. These are my two boxes and the mess I need to wind onto bobbins this week.


Once I've separated the strands and had to rewrap the remainder back on the bobbin, there are always loose bits. 


Which brings me to my first and only rule regarding embroidery floss storage:


No, it's not a life-or-death issue, but it is a big-time sanity preserver and worth following.

  
Needles 

Needles are easily lost and sometimes not so easily found, but they are definitely easily taken care of. 

Keep needles in a magnetized tin, needle case or pincushion. 

If you use or make a pincushion, it is recommended that it is filled with natural wool rather than plastic fibers. Even washed wool has enough lanolin to keep needles smooth and rust-free. A small emery or super-fine sand filled pincushion keeps needles sharp.

If you make or buy a needle case, make sure the felt is wool. 

Sourcing wool from local folks is not difficult. You don't need much and if you tell them what you want it for, they are likely to just give you a few handfuls for your pincushions. If not, it's not too expensive to buy just a little.

There are several sources for wool fleece in the Source Sew-pplies tab at the top of the page.

Now for the crazy cool links!

I've started a Pinterest board for embroidery floss storage.  These are some of my favorites and the links for these are on the board.

There's no one way to organize that's best. It just has to work for you.


There are also lots of cool links to bobbin patterns and printables for making your own. My favorite is the standard DMC cardboard bobbin. It's the one with DMC printed on it. It is thicker than most so it's sturdy and reusable. It's non-plastic which I prefer. And they have the little hole in the top so they can be used on a ring which is great for taking with you when you just need the colors you want for the project you are working on.

Which is exactly the subject of tomorrow's post - taking your stitching wherever you go. It's the last post in this series of Embroidery School.  And then we'll have a stitchery graduation party!

Want to catch up on all the lessons in Embroidery School? Click right here! This will take you to the Embroidery School page - same as the tab under the blog banner.

Want to stay in touch? Sign up for the weekly newsletter, receive news, promotions, and a spiffy free embroidery pattern.

Monday, May 9, 2016

Display Your Embroidery - Lesson Nine Embroidery School


When you become the proud owner or giver of your own needlework, the question of how best to frame the work comes up. Work can be left on the garment or household linen, made into hoop art, used as a quilt block or applique, or framed.

Framing


(Cardan Antiques)

The work can be framed under glass (or without glass) by you or a professional. Because this subject is larger than my interest area, I am going to point you in this direction for a beautiful tutorial that shows how to frame your work like a pro - without needing to be one. 

And here is a lovely Pinterest board with more links about framing needlework. This one by Cardan Antiques is particularly stitcher friendly.

But most of my patterns are worked to fit the hoop, and if not used as a quilt block or on a tote or other household or clothing item, will likely beg to be turned into hoop art.

Displayed in the hoop - Hoop Art

It's a bit of a dark, cloudy day in the studio. Perfect for spending quiet time working up the backs of some of my hoop art. 

What you need:

your finished work
the hoop you want to use as the frame
scissors
sewing needle and thread 
an iron
backing fabric or sturdy felt
inner layer (optional)

Lay the work over the inner hoop to center it where you want it. Cover it with the outer hoop.


Those pesky little bubbles can appear if your fabric is fine or the hoop is not completely tightly fitting as can happen with bamboo hoops.

Just gently pull the fabric edges out to flatten the bubbles.


Turn the work over and trim the fabric to about 2" or more depending on the size of your work.
 

This particular fabric was a rather delicious vintage cotton from the 70s. However, when the edges are folded to the back, it shows through. This sometimes happens even with heavier weight light colored cottons.

I solve this by cutting and inserting a circle of wool or felt before folding down the edges.


Using sewing thread, single or doubled as you feel the need, gather the edges and tie off. This contrasting thread was used just so you can see it. Use a matching thread color so it doesn't show through to the front of the work.
 

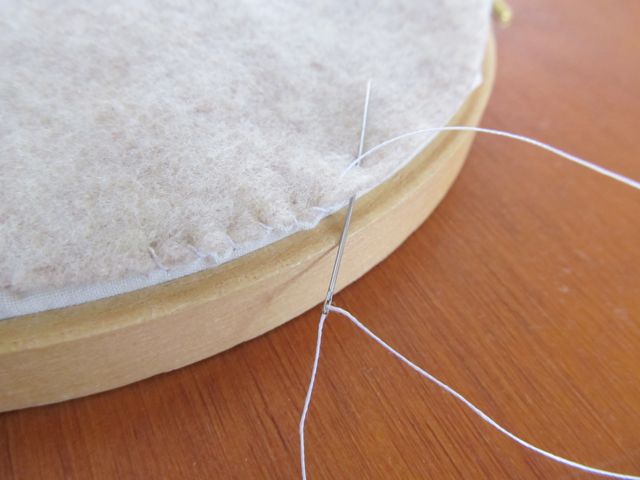
Use a hoop of the same size to trace and cut a piece of substantial felt, not the flimsy stuff, and whipstitch it to the edges of your work.

You can also use cotton or linen fabric that has been folded under at the edges, but the bulk can contribute to the work being "poked" out from behind.
 

Here it is all ready to be hung up. Tie a ribbon to the screw at the top or pop the screw top over a picture hook or nail on the wall.


Here are some other lovely ways to finish hoop art:

No sew fabric backing 

Backed with cardstock 

Wrapped hoop 

I'm not sure how this last one has been sorted out on the back, but it is recommended that you don't trim your work all the way down to the hoop.

ALL hoop art can shift and sag, especially when friends and family hold it and ooh and ah over it. (Which they will!) You need to be able to reach back and pull out the bubbles that will form at the edges.

Great job! Now that you have your sampler all hooped up and ready to hang up in your cozy little stitching corner or sewing room, it's time to clean up. 

No freaking out. Tomorrow, I'll show you my little set-up and share some links to help you organize your embroidery supplies.