
I recently designed this William Morris Sunflower Pincushion for the How.Do iPhone app. It was based on an Arts and Crafts movement William Morris sunflower wallpaper design.

You can use new or repurposed materials for this project. I have used upcycled wool sweater and blankets for the pincushion shown in this tutorial.
Wool fleece is the preferred stuffing for pincushions because it has a bit of weight and the lanolin keeps pins and needles from rusting.
Materials needed:
6 1/2” (15cm) diameter repurposed sweater or other stretch knit fabric circle
3 colors of wool felt or felted wool blanket:
1 – 7” (18cm) square for inner petals;
1 – 7” (18cm) square for outer petals;
1 – 10 1/2” x 1 1/2” (27cm x 4cm) strip for base
2
1/2” (6.5cm) diameter cardboard circle
Wool
stuffing

Stuff with a ball of wool fleece and top with a cardboard circle.

Pull your thread tight and sew your gather shut. Tie off securely. The cardboard now makes the base of the ball a bit flatter.


Wrap the inner petals around the ball with the gathered side inside the petals. Pin petals in place for now.
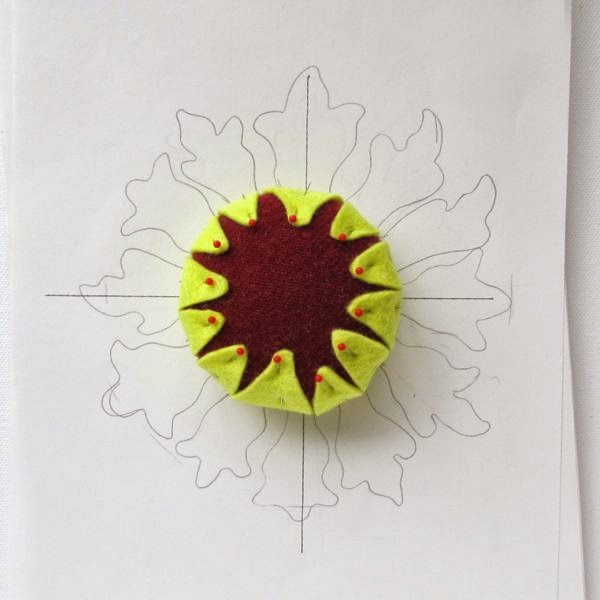
Don't worry about being perfect. Nature's petals are varied and unique. Yours can be also.

If you center your ball on the outer petals you can see how the sunflower is starting to emerge.

Using 3 strands of embroidery thread, attach the inner petals to the central ball with two or three long stitches up and down each petal. Pull tightly enough that it holds the petals close to the ball but not too tightly that the petals pucker.

Using 3 strands of embroidery thread, embellish the outer petals similarly but this time use a stem stitch to embroider your accents. Vary the number of accent lines per petal to create a more natural look. Keep the thread knots trimmed short and at the back of the petals.

Turn the ball over and center the petals over it, back side of the petals facing up. Use 2 strands of matching embroidery thread to sew the outer petals to the ball with a simple running stitch. I've placed a black thread around the ball to show where to sew.


So incredibly beautiful! I love William Morris and your interpretaion of his design is wonderful!
ReplyDeleteThanks Marsha! When I saw that sunflower, it hit me immediately! I would have liked to have had the time and materials to create a larger decorative pillow using the same method. I challenge me readers to make that or the pincushions and come back and show off!
DeleteVery cute Pincushion ! I would love to try make one !
ReplyDeleteI hope you do try. I'd love to see it when you do!
DeleteThat's one of the best pincushions I've ever seen, Allison. I love it!!! And such a detailed, easy to follow tutorial, too.
ReplyDeleteThanks so much, Pam. It was quite a challenge to find an easy craft representing some aspect of the Arts and Crafts movement. I'm so glad it works for you. :-)
DeleteFeatured today, Allison...
DeleteWow, thanks! And if anyone bothers to read these comments - go to Pam's site:www.threadingmyway.com. It's chockers with great projects and tutorials.
Delete