

There are some tutorials on the web for a puzzle ball or clutch ball but very few explain the 'puzzle' part of the ball and many actually sew all the pieces together discarding the puzzle component altogether.
This is how I learned to make an Amish puzzle ball from the women in the Mennonite community near my hometown in Missouri.

The puzzle ball is intended as an educational toy. It can be grasped by babies and taken apart and reassembled by older children. It fosters small motor skills which stimulate brain development and abstract thinking abilities.
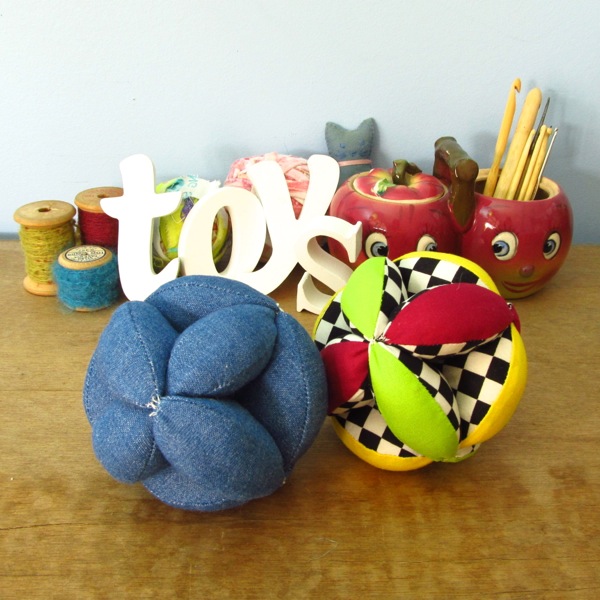
A puzzle ball can be made with fabric scraps of all types, preferably woven materials. You can use satins, velvets, calicos, denim, wool suiting, corduroy, whatever you have on hand. You can use felted wool, old blankets, sweaters. Stuff with wool, cotton, or other natural stuffing if you can. Not only do I detest the idea of a baby chewing on plastic fibers such as fiberfill, that stuffing tends to be too insubstantial for a puzzle ball. A good puzzle ball is solidly made.

Find a circular bowl or plate that is the desired size of your finished ball. Trace 6 of these circles on the wrong side of the fabric. Cut out the circles. Cut the circles in half and then in half again to make 4 wedges from each circle. You have 24 wedges. I'm using a 5" embroidery hoop here.

Cut 12 of these ellipses.

With right sides together, match the round edge of the ellipse with one round edge of a wedge. Sew together using a 3/8 inch seam allowance. If you are making a smaller ball or not very good at sewing curves on a sewing machine, hand sewing is your best bet. A larger ball can be machine sewn easily.
Repeat on the other side of the ellipse, sewing the other rounded edge to a second wedge. Sew one side of the wedge together and halfway down the other side. Turn this piece right side out.


Now you can see the wedge shapes you'll be sewing, sew 11 more. Turn all right side out. Stuff solidly and whipstitch or ladder stitch your wedges closed.

Use button thread, quilting thread, or embroidery floss to join the top corners of your wedges together. You want to sew three circles together made of 4 wedges. Sew tightly enough to keep pieces touching but loosely enough that the wedges are not smashed together.
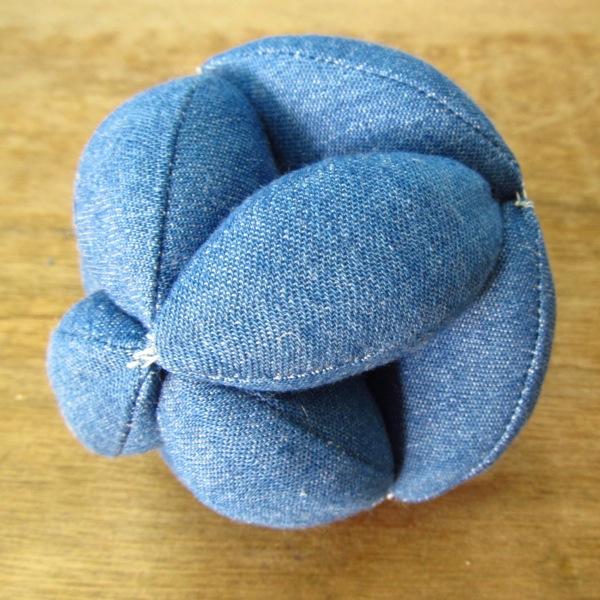
Now here's what makes the puzzle a puzzle! Leave one of the wedge circles as is with only the outer tops joined. Take the second circle and imagining the inner points numbered 1 through 4, sew points 1 and 2 together and sew points 3 and 4 together. That circle now looks like a mouth opening. Take the third circle and sew all the inner points together closing the circle.


To put the puzzle ball together, work the 'mouth' circle over the fully closed circle, like a rubber band. Point all the inner points to the inside center of the ball. Next work the open circle of wedges over the combined circles. Point all the inner points to the inside center of the ball.
Want to skip making your own pattern pieces as described above? You can buy the pattern in my Etsy shop. Link below.


HAPPY STITCHING!


Thanks for sharing your tutorial! I really like the puzzle ball I made using your instructions. =)
ReplyDeleteI'm so glad you enjoyed it! They really are remarkable.
DeleteThank you for the excellent instructions that include the "puzzle" part of the puzzle ball! I was getting frustrated sifting through all of the patterns online that just sew the pieces all together. Fantastic work! :)
ReplyDeleteThank you and I'm so glad you found the answer to the puzzle here. We'll just have to keep sharing its surprising secret and keep this lovely tradition alive and available.
DeleteI knew I'd seen this somewhere the other day - the Handmade Cooperative. It's fabulous!!! Great to see 'old' games revived.
ReplyDeleteHaha! Yes. It's over at Handmade Cooperative's blog this week: http://sweaterdoll.blogspot.com.au/2013/10/freemade-amish-puzzle-ball-tutorial.html
DeleteIt's a great group of Australian hand-makers.
Featured today, Allison...
DeleteThanks, Pam! Readers, for nine more incredible free tutorials, check out Threading My Way's features: http://www.threadingmyway.com/2015/11/threading-your-way-features_29.html
DeleteYou are a star - thank you so very much for this excellent tutorial!
ReplyDeleteThanks for stopping by. I'm so glad you like it!
DeleteThank you very much for your great tutorial. Best one I've come across for the amish ball.
ReplyDeleteWonderful! I hope you downloaded the PDF for your convenience. And please feel free to share. :-)
DeleteI had an Amish Pin Cushion that belonged to my grandmother who passed away in 1977. It was one of those things that I cherished with all my heart.
ReplyDeleteOne of our dogs thought it was a toy and she tore it up. I am been trying to find the pattern and then I could remake it and i wanted to make some for my daughter in laws. I hoped to see where I could add a picture of mine. I just cherish this item. Thank you for putting this on the site for use (sbidaho@yahoo.com or 208-240-7737). Thank you
I don't think there's a way to add photos on this blog, but I'm so glad you found the tutorial here. Did you download the pattern? (link is in the article) I'd love to see what you make. Click on my "Contact Me" page for all the ways to get ahold of me so I can share your photos.
DeleteAnd if there's any way for you to edit your comment, you might want to avoid putting your phone number there for everyone in internet land to see. I'd hate for someone unscrupulous to get it.
I can't find a link for the pattern in the blog. Is it still there?
DeleteI read your tutorial after reading a couple of others. The light bulb came on while reading yours. It is well-written and easy to understand. I am going to try making a couple, well, at least one. ;) Thanks for the tutorial.
ReplyDeleteThat's wonderful! I'm so glad the instructions were helpful to you. It can feel a bit tedious to make 12 of the little wedges but when you fit it all together, you'll be wanting to make another!
DeleteWonderful tutorial. Going to make one. Thanjs for sharing!
ReplyDeleteI'm so glad to hear that! Twelve wedges can get a bit tedious, especially if they are quite small, but watching it all come together is so much fun.
DeleteHi, thanks for sharing, this is a great way to use up all my bits and peices. I might make two for my newly arrived twin grandsons. I think I'd like to add something that makes a noise inside, like a bell or some noisy filling. Any suggestions appreciated. Thanks from Jean-in-stitches UK.
ReplyDeleteHi, Jean-in-stitches! Glad you like the project! I think you would have to find a very small container, like one of those old gumball plastic egg-shaped things that held a little toy and put a bell inside and stuff that into one or two of the wedges, but you might need to make the pattern a bit bigger to fit that. Another idea is to get some of that crinkle plastic or toy squeakers that can be put in pet and baby toys and insert that into a wedge or two. You would just have to adjust the wedge size to accommodate them. Merry Christmas!
DeleteHi, thanks for sharing, this is a great way to use up all my bits and peices. I might make two for my newly arrived twin grandsons. I think I'd like to add something that makes a noise inside, like a bell or some noisy filling. Any suggestions appreciated. Thanks from Jean-in-stitches UK.
ReplyDeleteHi, thanks for sharing, this is a great way to use up all my bits and peices. I might make two for my newly arrived twin grandsons. I think I'd like to add something that makes a noise inside, like a bell or some noisy filling. Any suggestions appreciated. Thanks from Jean-in-stitches UK.
ReplyDeleteWhat an awesome tutorial !!! Many thanks !!! i just finished the first one :)
ReplyDeleteI'm so glad you liked it!
DeleteThis comment has been removed by the author.
ReplyDeleteThis looks like a great pattern and I’m going to try to make one of these puzzle balls but I really want it to be an animal. Is there anything in the pattern that tells me where I could alter a pattern piece for the head and tail of an animal? I’m really excited about getting started with this! Thanks!
ReplyDeleteSounds lovely! Abby Glassenberg wrote a book about making animal puzzle balls. You can buy it on her Etsy shop here: https://www.etsy.com/listing/243253583/autographed-copy-of-my-book-sew-play. I don't think she sells the patterns separately. The book is also available on Amazon as a Kindle edition and anniescatalog.com sells a video of Abby teaching how to make them here: https://www.anniescatalog.com/onlineclasses/detail.html?code=SDV01. I don't have a pattern of my own for making them into animals.
Delete